Table 6.2.2
PERMISSIBLE LEVELS OF IMPERFECTIONS IN BUTT AND FILLET WELDS AS DETERMINED BY VISUAL, MAGNETIC PARTICLE AND LIQUID PENETRANT EXAMINATION OF THE WELD ZONE
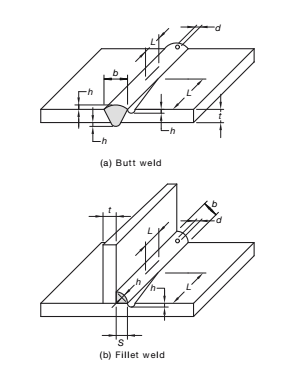
(see also Figure 6.2.2)
| Maximum allowable dimension or number of imperfections | Symbol | Imperfection (see Note 1) | |||
| SP | GP | Parameter | Type | ||
| BUTT WELDS | |||||
| No cracks allowed | Crater cracks only | L | Length | Cracks | |
| 6mm in 1000mm weld (rater cracks only) | ΣL | Cumulative length | |||
| Where located more than 3t from end of weld, 2t/3, but not more than 20mm
Where located within 3t of end of weld, 3mm |
L | As for undercut depth | Length for SP Depth for GP | Lack of fusion or incomplete penetration | |
| t in 6t length, but proportionally less for shorter length | ΣL | Lack of fusion or incomplete penetration | |||
| t/20, but not more than 1 mm | t/10, but not more than 1.5 mm | h | Depth | Undercut-continuous (see Note 2) | |
| t/10, but not more than 1.5 mm | t/5, but not more than 2 mm | h | Depth |
Undercut-intermittent (see Note 2) |
|
| As for undercut | — | — | Shrinkage grooves Root concavity | ||
|
For t ≤ 12 mm, 3 mm For 12 < t ≤ 25 mm, 5 mm For t > 25 mm, 6 mm |
Not limited | h | Height | Reinforcement (each side) | |
| As for reinforcemen | — | Height (depth) | Excess penetration | ||
| See Clauses 5.2.2 and 5.2.3 | — | — | Linear misalignment | ||
| t, but not more than 10 mm | 2t, but not more than 20 mm | L | Length | Overlap (see Note 3) |
|
| 30 mm in 300 mm, but proportionately less for shorter lengths | 60 mm in 300 mm, but proportionately less for shorter lengths | ΣL | Cumulative length | Overlap (see Note 3) | |
| Suitable to permit required in NDE report | No restriction | — | — | Toe shape, other than above | |
| t/3, but not more than 5 mm | Not limited | d | Size of pore | Surface pores (see Note 3) |
|
| Two per 12t length | Six per 12t length | — | Number of pores | Surface pores (see Note 3) | |
| ≤5%< | ≤10% | — | Loss of area | Loss of cross-sectional area (see Notes 4 and 5) | |
| FILLET WELDS | |||||
|
For S ≤ 12 mm, 2 mm For 12 < S ≤ 25 mm, 3 mm For S > 25 mm, 4 mm |
Not limited | h | Height | Reinforcement | |
| S/10, but not more than 3 mm | S/5, but not more than 4 mm | — | Leg length | Undersize-intermittent (see Note 6) | |
| As for butt welds | — | — | Other surface imperfections | ||
| As for butt welds | — | Loss of area | Loss of cross-sectional area (see Note 5) | ||
|
NOTES TO TABLE 6.2.2: 1 For adjacent imperfections, see Clause 6.2.3. 2 Undercut less than 0.5 mm in depth should be disregarded. 3 Where these allowances for overlap and surface pores are detrimental to any surface treatment, they may not be acceptable. 4 For a welding procedure qualification, the assessment of the test piece for compliance with the permissible levels of imperfections should be done with the aid of the macro test specimen. For calculation of the loss of cross-sectional area, internal imperfections are estimated from the macro test specimen. 5 For the calculation of the loss of cross-sectional area, all relevant surface imperfections shall be included. Where lack of root fusion is evident, the inspector is required to assess the approximate depth of the imperfection. The macro test specimen from the welding procedure qualification may need examination for this purpose. 6 The cumulative length of intermittent undersize fillet welds shall not exceed 10% of the length of the weld. |
|||||

DIMENSIONS REFERRED TO IN TABLE 6.2.2 LEGEND: L = length or maximum dimensions of individual imperfections measured parallel to axis of weld L = sum of lengths of imperfections in stated weld length h = height (depth) of imperfection t = thickness of parent metal (thinner) b = width of weld face d = size of pore S = size of fillet weld (see Clause 3.3.1) |
|||||

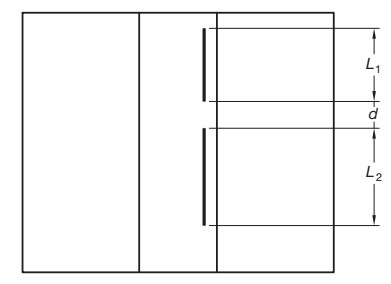
(a) Aligned imperfections Where d is less than L 1 the smaller imperfection, ΣL= L 1 + L 2 + d Where d is not less than L 1 the smaller imperfection, ΣL = L 1 + L 2 |
|||||
|
(b) Overlapping imperfections |
|||||
|
NOTE: Treat as separate defects. (i) Cross-section (ii) Longitudinal section, where d > 5mm |
|||||
|
NOTE: Treat as a single defect wi th dimensions h and L as shown. (iii) Longitudinal section, where d < 5mm (c) Overlapping vertical displacement |
|||||